As you may already know, I am building Luminesca in Unity which has a simple, fast pipeline and supports some useful plugins, namely Polygon Tool and 2D Toolkit (among others).
1. Layering Up
A key thing to be aware of is that Luminesca's environments are built in 2D layers, set apart at fixed distances on the Z axis to give them depth. I always use a Z depth value of zero for the gameplay layer, where all the action takes place. This just makes it easier to remember and helps working out whether everything is aligned correctly. I use a Perspective camera (as opposed to Orthographic) with a very low field of view so I can get some nice parallax effects on the background layers.

Click to enlarge
I use empty game objects as 'managers' for each layer so I can find them easily. All of that layers components (like meshes and sprites) are children of these manager objects, and are all assigned to a visibility layer in Unity so I can hide and show them when necessary.


2. Shapeshifting
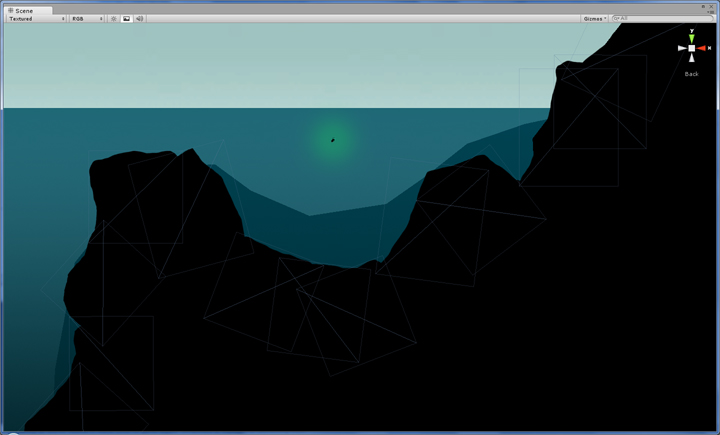
Once I've got my layers set up I'm ready to start drawing out a rough shape for the environment. To do this I use a plugin called Polygon Tool, which is available in the Unity Asset Store for a very reasonable $10. This tool allows you to draw out 2D meshes simply by clicking to place vertices, and it automatically builds a collider from the shape you draw. So using Polygon Tool I sketch out a crude outline of the level.

At this stage I don't really bother adding much detail or making it look nice. It's just there to get a feel for the size and shape of the environment, so I have a swim around and maybe make some adjustments until I'm happy with it.
Next I'll add in some simple more polygons for the background layers. This just helps to give the empty spaces some definition, which helps to navigate the open bodies of water where there are no edges. I make sure collision is disabled for these layers; the player will never be able to get back there so we don't need Unity to calculate any physics interactions for them. You may also notice the unsightly angle in the bottom-right corner. Well, that's fine, because that will be hidden behind the main gameplay layer!

3. Less Talk, More Rock
I've now got a rough shape for my whole level. By this point I've added some gameplay objects like creatures so it's time to start adding rocky visual detail to the main level collision. To do this I use the excellent 2D Toolkit plugin ($65 on the Unity Asset Store). The sprites themselves are simple black textures with an alpha channel for the transparent parts. 2D Toolkit lets you bake collections of sprites down into a mesh for a single draw call, so it's all nicely optimised at runtime.
Creating the terrain is just a case of chucking sprites in and matching them up to the polygon mesh I made earlier by rotating, scaling and flipping. This time I'll take a bit of extra care to make it look nice and convincing, using the polygon mesh as a basic guide for the overall shape.
By the way, all of the rocky terrain is just made up of different configurations of these three sprites. Efficient!

4. Chiseling Away
We now have a problem: the sprites do not have any collision, so what the player bumps into (the collision mesh I built earlier) does not match what they can actually see. There will be rocks which look solid, but the player will be able to pass right through them, highlighted in red in the image below.

To fix this, I go through with a fine-toothed comb and make sure the vertices of the collision mesh match up with the finer details of the sprites. I don't add too much detail though, as collider complexity ultimately results in more physics calculations, which slows the game down on less powerful machines. Therefore this stage results in an approximation of the visuals, albeit a fairly accurate one. There's still a bit of a rim around the edges but this is acceptable as it just looks like foreground detail when the player sprite goes behind it. It's far from being misleading like it was before.

It is possible to create a mesh collider for each sprite and have 2D Toolkit instantiate them, but I decided to manually shape the collision because there's a lot of sprite overlap which would result in unnecessary vertices existing, and I also wanted more control over the collider.
5. Let There Be Life!
Of course, I could leave it there, but this would look even better with some details like foliage in the foreground and background. These are placed just like the rock sprites, only they don't have any collision (nor do they require it).

Finally, I'll probably add some more background detail and maybe an extra layer or two. Then just click Play!

Glad you're still working in this. I hope it gets through to greenlight games. This post was extremely useful to me as my next project will be a platformer and 2d toolkit was actually one of the tools I was thinking of purchasing. Sounds like it's a great investment. I 'll also be looking into purchasing the polygon tool as well.
ReplyDeleteLook forward to reading your progress.
Thanks! I'm going to submit it to Greenlight Games when it's closer to completion, but it is in Greenlight Concepts already!
Delete2D Toolkit seems to be a popular choice, I'd definitely strongly consider it if you're working on a 2D game (particularly if you're going to be using animated sprites).
Are you using polygon tool with 4.3? For some reason I cannot get the collisions working with rigidbody2d / boxcollider2d etc. My character falls through the polygon mesh. Did you do anything custom when you set up the polygon tool collision?
ReplyDelete